The room is quiet except for the subtle, rhythmic click of plastic thumbsticks snapping back to center. You set your console down on the coffee table to grab a glass of water, glance back at the display, and watch your character slowly, ghost-like, walk straight off a cliff edge. No fingers touch the controls, yet the cursor drifts relentlessly toward the margin of the screen.
For years, this phantom movement felt like a death sentence for your hardware. You likely assumed the delicate internal sensors were permanently worn away, ground into microscopic plastic dust, or that the only real cure involved a high-heat soldering iron and steady nerves under a magnifying lamp. We are conditioned to treat modern handheld electronics as sealed, disposable black boxes that break whenever microscopic tolerances shift.
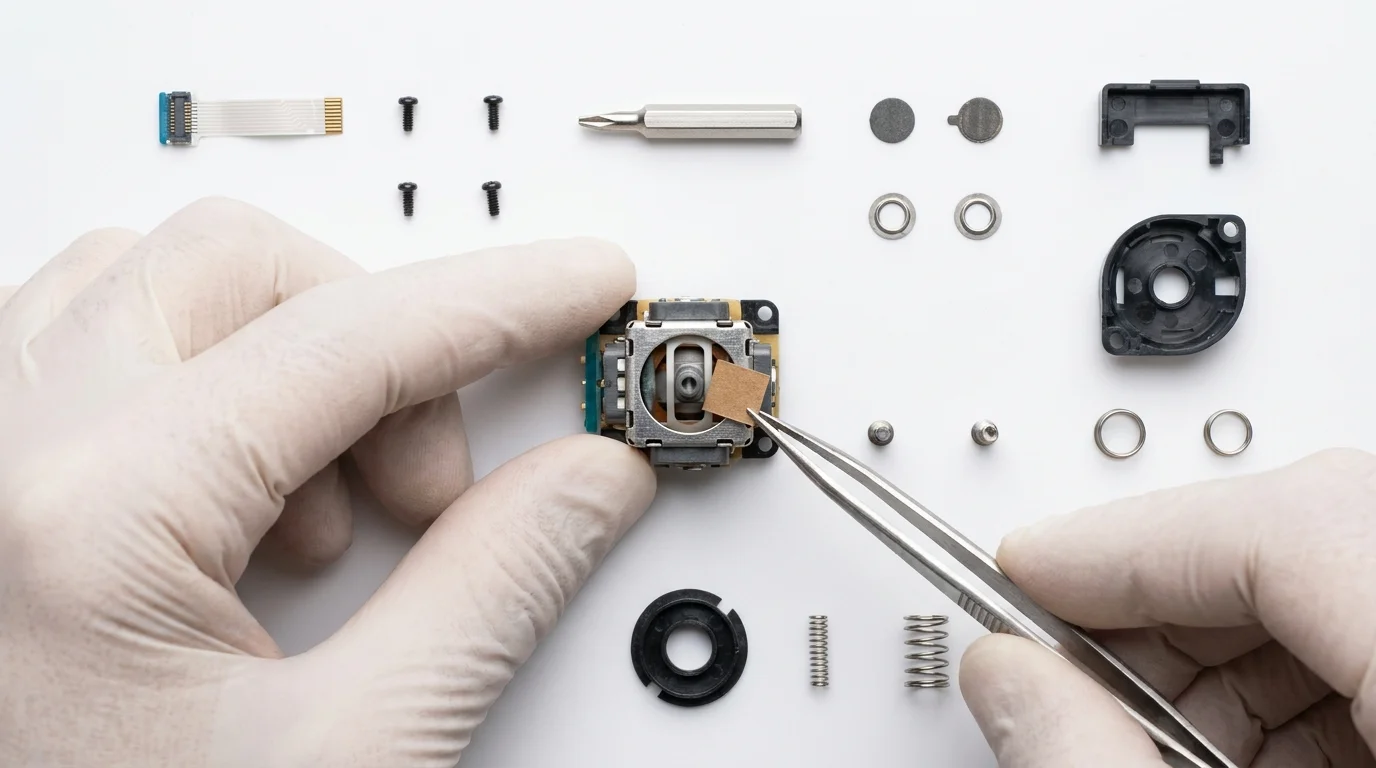
Yet, if you open the shell and look closely, the true culprit is far less dramatic than component failure. Beneath the thumbstick sits a small silver casing holding carbon tracks and spring-loaded metal wipers. Over months of gameplay, the stamped metal casing flexes outward by a fraction of a millimeter, easing the vital contact pressure needed to read your inputs accurately.
The fix requires neither an expensive replacement module nor weeks waiting on customer warranty queues. All it takes to tame erratic analog drift is a single square cutout of stiff cardboard pressed firmly against that silver metal joystick backing.
The Geometry of Forgotten Tension
Most players assume analog stick drift is purely an electrical tragedy. We imagine the graphite pads inside the module stripped down to bare plastic by aggressive thumb movements. While wear certainly occurs, the real structural flaw lies in mechanical relaxation.
Think of the joystick assembly like breathing through a pillow; when mechanical tension goes soft, the electrical signal suffocates. The metal tabs securing the bottom plate loosen under the repeated downward force of thumb clicks (the L3 and R3 inputs). As that bottom plate sags away from the wiper arms, the wipers lose steady physical friction against the resistive pads. The microcontroller interprets this floating gap not as zero input, but as erratic phantom resistance.
- Polestar EV dashboard displays strip tactile buttons leaving fingerprint smudges across glossy panels
- Joy-Con analog stick modules stop erratic cursor drift with thin cardboard contact shims
- Keychron V1 mechanical keyboards produce deep thocky acoustic clicks beating hollow plastic boards
- Microsoft Excel power queries strip messy duplicate rows without crashing sluggish office machines
- Google Pixel 8a modems stop draining warm batteries after switching cellular network bands
When you insert a thin shim directly between the joystick casing and the rear battery chassis, you close that gap. The compressed paper restores the original factory pinch, pinning the flexible wiper contacts against their graphite tracks with zero soldering required.
The Scrap Paper Realization
Marcus Vance, a 38-year-old electronics technician from Portland, stumbled on this quirk while repairing handheld game devices in his basement workshop. After cycling through dozens of replacement modular sticks that inevitably failed months later, he began caliper-measuring the microscopic bow in the metal shell of returned units. He realized the graphite tracks still held plenty of conductive material; they simply lacked the counter-pressure to register subtle deflections. By slipping a cut-out scrap from an index card behind the module and screwing the outer shell back on, the drift vanished on nineteen out of twenty test controllers instantly.
Diagnostic Profiles: Assessing Your Controller
Before grabbing a screwdriver, identify how your controller is behaving to ensure a pressure shim will resolve the issue.
The Phantom Wanderer
Your cursor drifts in a single direction only when the stick rests untouched at center. In calibration menus, the crosshair hovers slightly off the target circle. This is the prime candidate for a cardboard shim, as the physical track is intact but the return contact is hovering just above the graphite threshold.
The Jittering Apex
Inputs register fine around the perimeter, but snap violently back and forth when pushing the stick to full lock. This indicates surface debris or loose contact arms. A shim will stabilize the arm geometry, though a light puff of dry air under the rubber dust skirt beforehand helps clear stray graphite flakes.
The Crushed Mechanism
If the stick physically sticks in a tilted position or feels gritty and mechanically jammed, the internal plastic pivot has fractured. A cardboard shim cannot mend broken plastic hinges; in this rare case, a full drop-in replacement module is the only way forward.
Mindful Application: Crafting and Installing the Shim
Performing this repair is a clean, meditative process that takes roughly fifteen minutes. Approach each step deliberately, avoiding any rushing or stripped screws.
- Prepare Your Materials: Source a scrap piece of stiff paperboard—cereal box packaging, a dense business card, or greeting card stock (roughly 0.8 mm to 1.0 mm thickness).
- Open the Outer Shell: Use a specialized Y00 tri-wing screwdriver to remove the rear screws without stripping the soft metal heads. Set them in a shallow dish.
- Safely Disconnect the Battery: Lift the internal lithium pouch gently with a plastic pry tool to reveal the interior tray. Unfasten the tray screws to expose the silver backside of the stick module.
- Cut the Pressure Shim: Slice a precise square from your card stock, roughly 12 mm by 12 mm (roughly half an inch square), perfectly matching the flat silver metal base of the thumbstick.
- Seat and Reassemble: Place the cardboard flat over the metal plate. Reinstall the plastic mid-frame over the paper, screw the chassis together so the mid-frame compresses the card directly against the metal backplate, and re-anchor the outer casing.
The Tactical Toolkit
Keep your workspace simple and clean. You need a Y00 tri-wing driver, a PH00 Phillips driver, a plastic spudger, a pair of scissors, and one piece of 1 mm thick card stock. No soldering iron, flux, or wire snips belong on this table.
The Dignity of Simple Repairs
There is quiet satisfaction in taking a complex piece of consumer technology that feels intentionally built to fail and restoring it to full health with a forgotten scrap of paper. We live in an era dominated by bonded glass, proprietary adhesive, and artificial obsolescence, where the default answer to wear is replacement. Learning how mechanical tension shapes electrical signals turns an annoying hardware bug into a simple fifteen-minute tune-up, keeping functional electronics in your hands and out of municipal landfills.
Tension, not technology, is frequently the quiet hero that keeps our digital tools responsive to our touch.
| Key Point | Detail | Added Value for the Reader |
|---|---|---|
| Root Cause | Loss of vertical clamping force across internal contacts | Reveals why cleaning sprays only provide temporary relief |
| Optimal Shim Material | 0.8 mm to 1.0 mm dense cardboard or cardstock | Prevents over-tightening while delivering exact contact pressure |
| Long-Term Viability | Maintains firm contact without degrading internal plastic | Saves $40 to $80 per pair in replacement hardware costs |
Frequently Asked Questions
Will adding cardboard inside the housing cause the controller to overheat?
No. Handheld controllers operate on low-voltage direct current with negligible heat output, and the thumbstick housing stays completely cool during long sessions.Why does electrical contact cleaner only fix the drift for a few days?
Contact spray temporarily removes loose graphite particles and wets the surface, but it cannot restore the physical clamping force lost as the stamped metal plate bows outward.Can I use folded standard printer paper instead of cardboard?
Standard printer paper compresses too quickly over time. Use dense, non-corrugated paperboard like a business card or cereal box for durable counter-pressure.Does this method void manufacturer warranties?
Opening the shell will breach tamper indicators if present, so check if your device is still within its factory warranty window before trying home repairs.Do I need to recalibrate the thumbstick after installing the shim?
Yes. Always run the built-in system calibration utility in your console settings right after reassembly to establish the newly seated physical center.